We had a huge family Christmas Eve dinner at our home again this year after a successful run at it for the first time last year. I think we are making a tradition of this, which thrills me! We love making big, multi-course dinners for a lot of people and don’t get the chance to do it very often at all (like in the old, no-kids days). I have a terrific mother-in-law who would do anything for us and asks nothing of us, but last month, she asked me to make a white wedding cake as soon as possible. She loves my white wedding cake (a recipe from recipegirl.com). I wouldn’t normally make a white cake for Christmas dinner, but I love a challenge and I found the neatest cake in the world – it’s even called “Christmas Eve.” So… I did it!
I was a little nervous about this – I’ve made a lot of cakes in my days but this one was entirely different. I’m an amateur who just really likes decorating cakes – I don’t have real skills. I’d spent so much time thinking about how I was going to make the cake that I felt like I was 25% done before I even really started. I’d never lit a cake with lights before so that was my main challenge at the beginning, but I ordered some neat battery-operated “balloon lights” that ended up working out perfectly.
Here is the cake that I found online:
Here is the cake I ended up with:

I am still so excited that it worked out – I really didn’t expect it to turn out as well as it did.
A lot of people asked me how I planned to do this cake, so I took pictures along the way 🙂
My plan was to make the snowman, tree, windows/door, and snowflakes out of fondant well ahead of time, which I did end up doing. I planned to bake and freeze the cakes (two very deep 10″ white cakes to make a 2-tier cake) a week ahead of time but ended up baking them just the day before show-time. The bulk of the frosting and construction of the cake was planned to take place on Christmas Eve throughout the day, which is exactly what I did. I planned to use royal icing for the ice cycles, tree snow, and piping but I’ve never used royal icing and once the cake was looking pretty good, I decided not to chance it and just use buttercream. That was a good decision.
12/06/2015
Fondant snowman and pine tree were constructed. Both were dusted with pearl dust to add depth and dimension. I added buttercream icing to the tree for the snow on Christmas eve.

12/08/2015
I finished up my fondant work on the 8th! I started with the snowflakes for the border between the white fondant and blue buttercream, and ended up cutting them ALL in the wrong color (blue). When I realized the mistake, I was sort of relieved because I wasn’t crazy about how dark the blue came out. I re-did them in white and had them done quite quickly because I’d already mastered the snowflake fondant cutter/press.

Then it was time to move onto the cabin pieces. It took FOREVER to get the brown fondant dark enough, but it finally got there. I used a precision fondant knife which really was just a food-safe exacto knife (waste of money) and cut the pieces very irregularly because I wanted it to look rustic. I cut accent wood pieces to add depth and put them together, but was not happy with the final product. It was too flat – it needed texture. I found a small flat brush in my cake kit and dry-brushed brown gel dye onto the pieces. They look MUCH better and very rustic!

When I gathered the mail on my way back into the house after picking Matthew up from school, I found my “balloon lights” in the mailbox. HOORAY! I’d been wondering if they’d be small enough to put behind the cabin walls to light the cake and I was so relieved to see that they would work PERFECTLY!
The next, and final step, was to figure out how to put “glass” in the windows. I was going to buy rice paper but I just didn’t want to – I wanted to try making it. I searched for videos on “how to make edible glass” and found a perfect tutorial. The lights I got are a very bright cool white, which is too bright. I need the glass to tone down the brightness and the video explained how to make a golden-colored glass. I got to work with the boys and I LOVED the final product!

12/23/2015
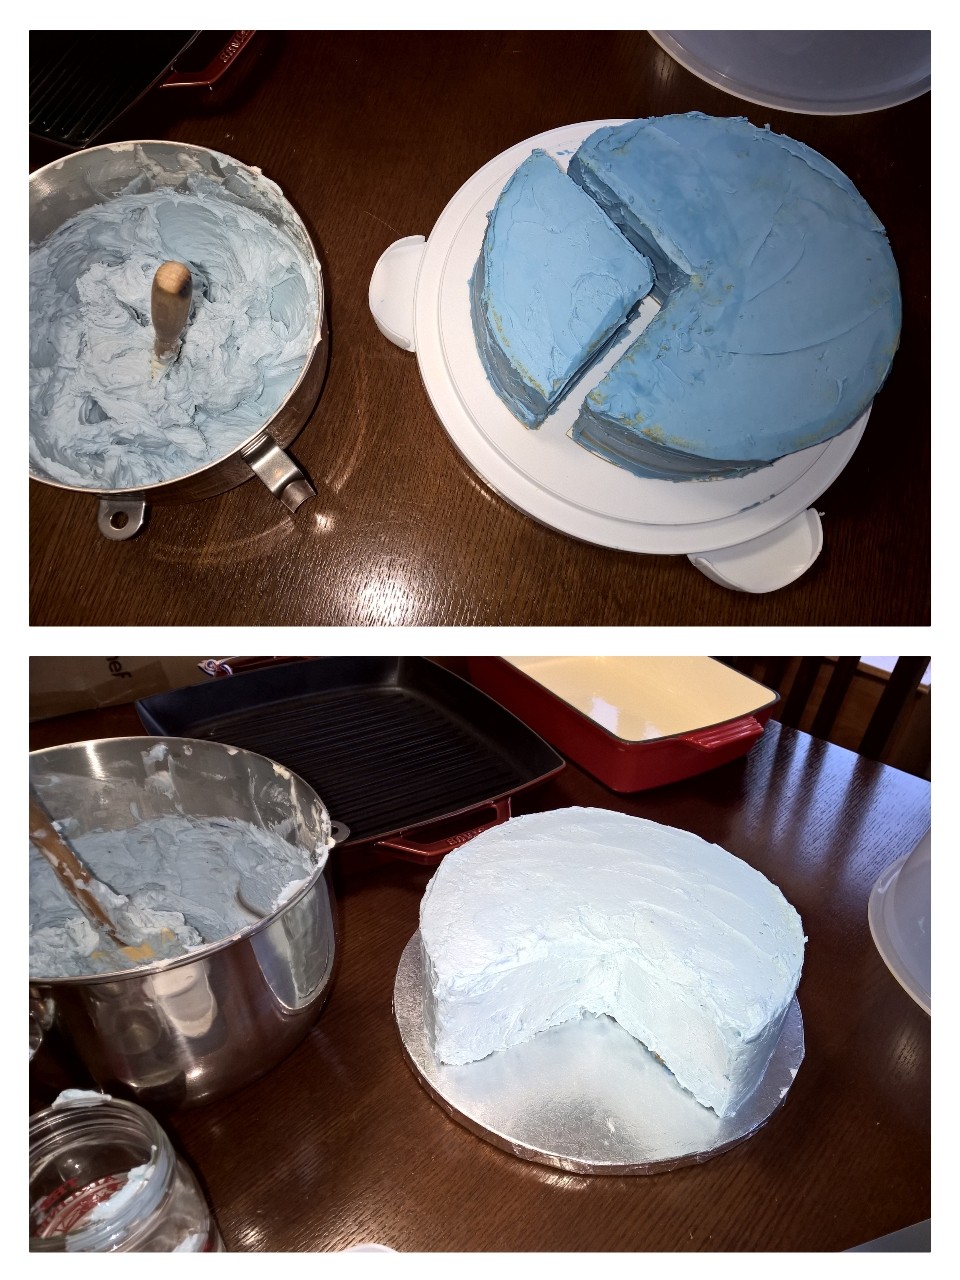
I baked up the cakes in the morning and let them cool, covered and on a cooling rack, all day. I then popped them in the freezer for 20 minutes while I whipped up a batch of buttercream to do my “crumb coat,” which I almost NEVER do because I’m lazy. Because it was critical for this cake to be smooth and presentable since the entire thing was not going to be covered in fondant, I opted for the crumb coat. I put too much “cornflower blue” dye in the frosting and ended up with that darn dark blue again. Oh well, it was just the crumb coat. I first leveled the cakes and then stacked them with icing between them (obviously). The next step was to cut out a section of the cake that would be put on top of the bigger piece. Once done, I covered each section with a thin layer of frosting, put support sticks in the large cake where the smaller cake would be placed on top of it, and then put them in my cake box and in the fridge for overnight storage (buttercream should be kept cold).
12/24/2015
I got to work at 10:00 AM when Hottie took the boys to a movie to give me space and time to do my work. I so appreciated that! I took the cakes out of the fridge to let them warm up a bit. I started by making a double recipe of REAL buttercream icing (recipegirl.com) and I split it in 1/4 white, and 3/4 for blue. I did not like the blue that I made for the crumb coat and needed it much lighter, so I died it slowly. This, however, made the icing too fluffy and airy – a problem but not a big one. I covered both sections of the cake with a generous layer of ice blue buttercream, and the color was perfect!

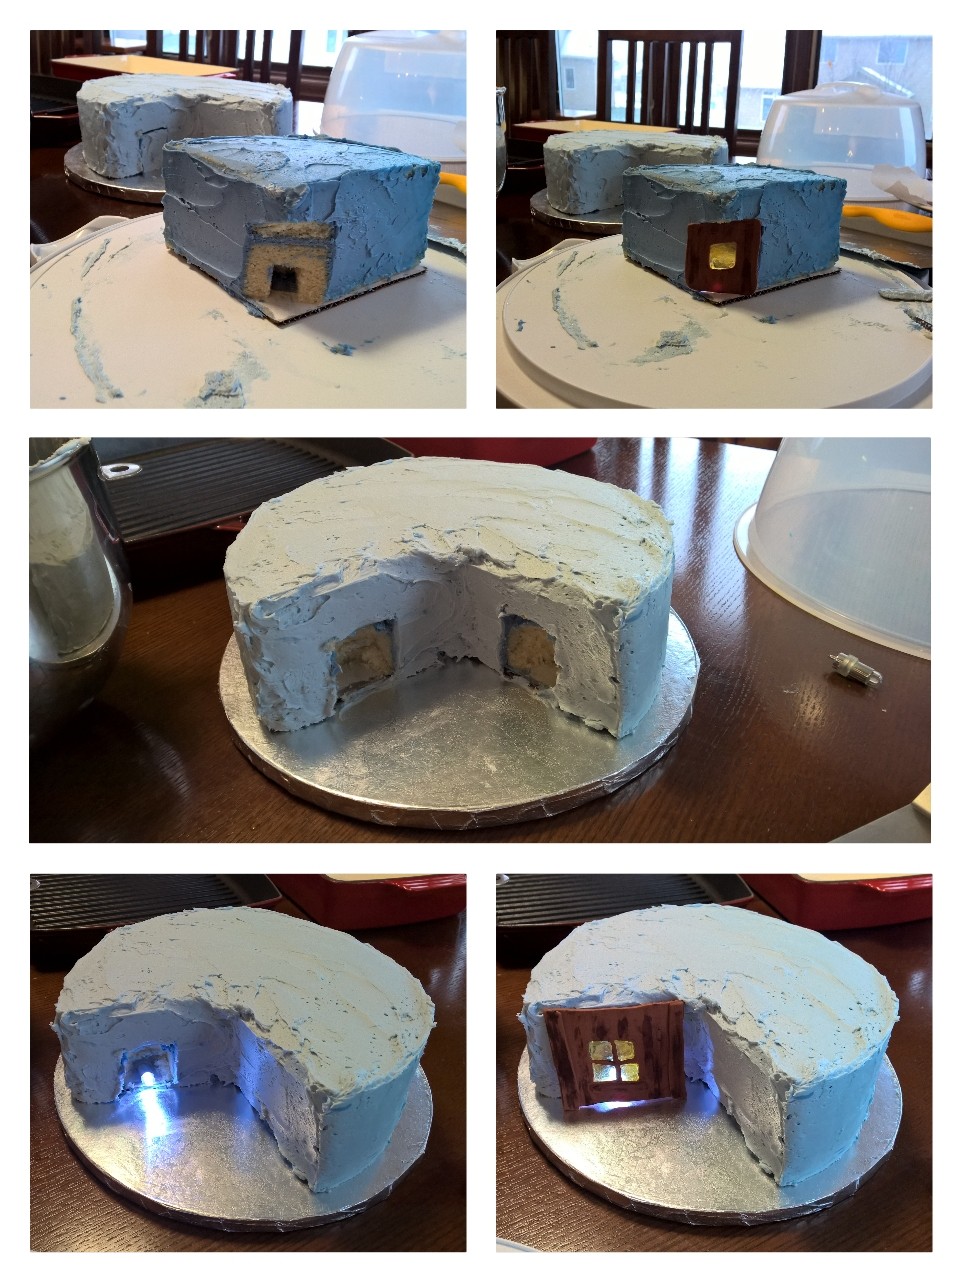
Next, I cut out the sections where the lights would go behind the cabin fronts. This was a little tricky – trial and error. The lights could not have been more perfect for the job! I tested out all of the cabin fronts to make sure they fit well, and they did.

The fondant was next. I love rolling and playing with fondant – it truly calms my nerves like nothing else can. I could roll fondant for hours. The layer on the bottom tier was not to be perfect – it was to have sections out of it to reveal the blue buttercream underneath. I just rolled a funky shaped, large piece of fondant and laid it on top. I had to do minimal trimming of the fondant to reveal the blue icing. The top-tier was completely covered in fondant. Where the fondant didn’t meet seams correctly, I just patched it together. I then, again, made sure that the cabin fronts still fit properly. They did.

The next step was adding snowflakes all over the cake! I used cake adhesive and they went on very easily. I used the snowflakes to cover the fondant seam imperfections, which made the cake look even better!

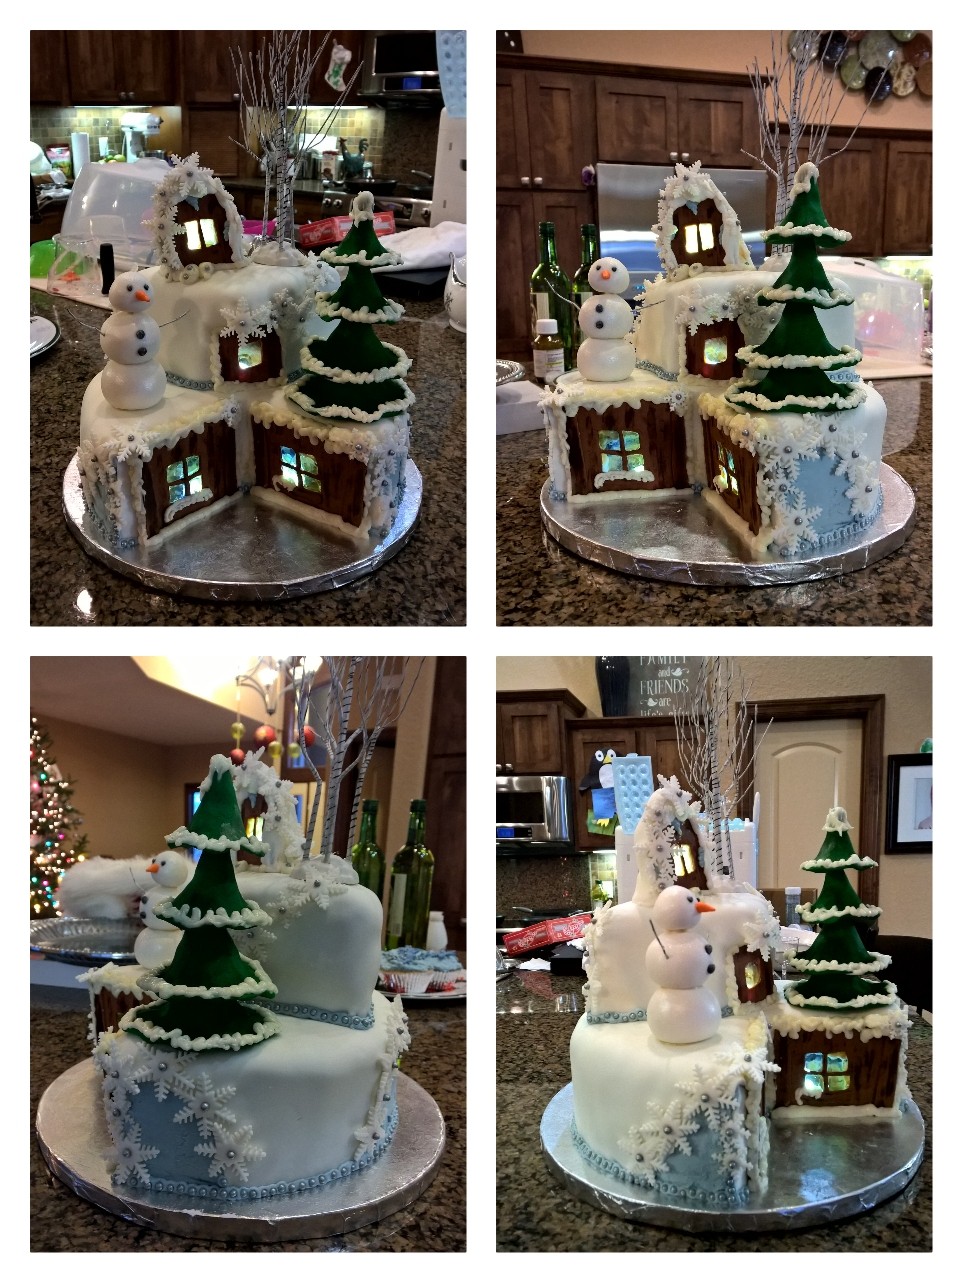
The final hard part was putting the blue piping around the bases of the cakes. It was made out of buttercream so as I squeezed the piping bags, the butter melted more and more. I was in a rush to get it done without melting the frosting! I added the silver beads and then we popped it in the fridge to harden up the buttercream piping.

The final steps were tossing the lights in, putting on the cabin fronts, piping the cabin fronts to the cake to seal up any seams, putting “snow” on the tree with buttercream, and putting the snowman, the green tree, and the twiggy tree on the cake. I added a few more snowflakes and a bit of snow in the windows and icicles on the cabin and called it done! It went back in the fridge until it was time for dessert. When I pulled it out of the fridge, I was so happy to see all 4 lights still going (they were advertised to run for 8 hours, but I wasn’t chancing it)! I sprinkled some sugar crystals on top of the whole thing for loose snow, and it looked beautiful! I brought it up with the lights out and everyone LOVED it.

As the boys would say… Ta Da!


")